Access Denied
IMPORTANT! If you’re a store owner, please make sure you have Customer accounts enabled in your Store Admin, as you have customer based locks set up with EasyLockdown app. Enable Customer Accounts
Print from USB using


There are two options to print your 3D model via USB - using the onboard slicing functionality on the touchscreen or by saving the sliced file directly onto the USB.
Option 1. Printing from a USB with Robo R2 and Robo C2 (after file has been sliced)


2.
Copy the GCODE file onto a USB drive.

3.
Eject USB drive from computer.

4.
Insert USB drive into the USB port on the front of the printer.

5.
Select files from the touchscreen.

6.
Then, select USB Storage.

7.
Select the icon on the top right corner for more options.
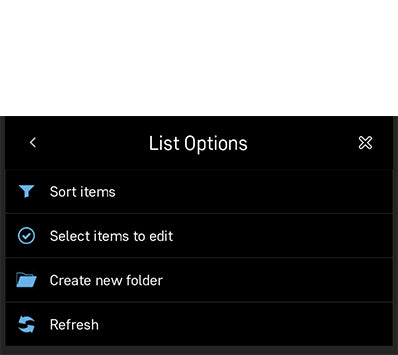
8.
Here are all of the options. Click on SELECT ITEMS TO EDIT.

9.
Select the file that you want to print. Press the top right check mark.

10.
Select COPY ITEMS. Press the top right check mark.

11.
Save your file locally on the printer by pressing the top right check mark.

12.
File is now saved onto your printer. Select the file.

13.
Press START and your print will begin.
Option 2. Printing from a USB with Robo R2 and Robo C2 using onboard slicing
1.
Find a 3D model that you would like to print. Ensure the STL file is saved on your computer.
2.
Copy the STL file onto a USB drive.
3.
Eject USB drive from computer.
4.
Insert USB drive into the USB port on the front of the printer.
5.
Select files from the touchscreen.
6.
Then, select USB Storage.

7.
Select the file you would like to slice.

8.
Press START to begin slicing your file.

9.
Select support setting. Click top right arrow to continue.

10.
Select which bed adhesion that is appropriate for your print.

11.
Select print quality (standard is .15mm).

12.
Select infill settings.

13.
Now, select print material (PLA is only for C2 & R2 while R2 has option to print ABS).

14.
Choose the standard material settings or to edit the temperature for the print bed (R2 only) or extruder nozzle.
15.
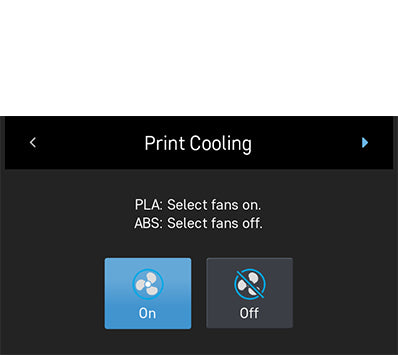
Select the appropriate print cooling for the material type.

16.
Print will begin slicing.

17.
Once slicing is complete, you have the option to save the file onto your printer. Save the file by selecting the top right check mark.

18.
The file is now saved to your printer. Select the file.

19.
Press start and your print will begin.
Invalid password
Enter