3D Print Coral Reefs with Sam Suchin of Hope3D

Calling all NOSTALGIA!
Since Robo was founded 5 years ago, we have seen the rise and demise of many different print bed surfaces and materials all meant...for adhesion. It has been one of the biggest and most important topics/frustrations/discoveries around 3D printing - you want a 3D print to stick to the platform well enough while printing, but not TOO good to where it's near impossible to get off once your 3D print is finished.
This presents an interesting problem and the industry has been all over it, trying to solve it. Below is some of the surfaces and materials we have ALL used and grown to love over the years.
Blue Painter's Tape
Perhaps widely known as the most popular 3D print bed adhesion is somethng as simple as blue painter's tape. In the early days of 3D printing, EVERY bed surface was covered in ripped blue painter's tape. The reason for this success is the polymer coating on blue painter's tape as well as the inconsistencies in the surface of blue painter's tape, which helps prints adhere to it. If you are a 3D printer user (and have been for years), then seeing blue painter's tape should give you a good ol' feeling of nostalgia.
Pros:
- Cost
- Ease of application
- Ease of print removal
Cons:
- Surface quality not that great
- Durability not great
Kapton Tape
Due to its temperature tolerance, Kapton tape is used in 3D printing as a printing surface (applied to a heated build platform), as well as insulating hot-ends. When heated, polyimide film adheres particularly well to ABS plastic and can be used to prevent or reduce warping. Albeit, it being a great surface to print on, it is a big pain to apply to a surface and it gives off the look and feel of a burnt lightbulb. I would have only recommended this surface to experienced 3D printer users due to the fact that you need to have your calibration dialed in close to perfect for the best adhesion to this surface.
Pros of Kapton:
-Durability
-Surface quality of finished print
Cons:
- Application is difficult
- 3D printer needs to be dialed in perfectly for Kapton to be extremely effective
Borosilicate Glass
Glass has been used as a print surface for years due to its ability to be extremely flat and to get an exceptional surface finish on your print. When you have a heated platform, the recommendation is to always use borosilicate glass. Borosilicate glass is a blend of silica and boron trioxide, which results in the ability to withstand higher temperatures needed for certain filaments as well as extreme durability.
Borosilicate undergoes very little physical changes when subjected to higher temperatures, which means it will not be prone to warping, much like normal glass surfaces would. Hence, borosilicate glass was a must use for many 3D printers including our Robo R1+, which currently uses a borosilicate glass 3D printing surface.
Pros of borosilicate glass:
- One-time setup
- Surface finish
- Consistent flatness
- Easy removal
Cons:
- Requires additional surface treatment for adhesion like Aquanet hairspray or glue stick (occasionally)
- Still prone to breaking
ABS Slurry/Juice/Glue
ABS slurry came around a few years ago when someone decided to melt ABS with acetone and use it to coat a surface for adhesion. Since ABS adheres well to ABS, which you see in heated chambers in industrial applications for 3D printing, it just made sense. With ABS or larger prints (of any material), the tendancy of 3D prints warping is a major concern. No one wants their prints peeling up around the corners.
There are a few ways to prevent this and one of those is using ABS slurry or ABS juice. This is essentially taking small bits of ABS plastic material, putting them in a jar, and adding 100% acetone to the jar, so that it melts the ABS over a period of hours into a cloudy glue type material.
ABS slurry is something you can use to lightly coat the surface of your print bed to obtain a nice sticky surface in hopes of preventing any warpage. And it works quite well with ABS itself as the 3D printing material! Yes, you have to melt ABS into a slurry and print more ABS on top of it. It's like a cannabilism of polymers.
The process for actually creating your own ABS slurry can be found in an Instructables article. Click here to check it out.
Pros of ABS slurry:
- Works extremely well with ABS to prevent warping
Cons:
- Somewhat difficult to make
- Only lasts a few prints per application
- Need to have the right amount of acetone to ABS
Glue Stick
The inevitable Elmer's glue stick is a handy piece of adhesion that should be kept on any avid 3D printer user at all times, in case of a 3D printing adhesion emergency. All you need to do is pop off the cap and spread some of the glue stick around the area for your next print.
Pros of glue stick:
- Works well with any material
- Cheap price
- Easy to apply
Cons:
- Causes messy print bed surface and diffcult to clean off
Magigoo
Magigoo is a product that we really like. It works great in terms of adhesion, easy to apply, and comes off the surface of the print bed much easier by flaking off. So, cleaning and maintaining your print surface cleanliness is not a problem. The company has been focusing on the chemical compond of Magigoo, as well as the easiest application methods - they definitely know a thing or two about it. You can pick up some Magigoo on our website by clicking here.
Pros of Magigoo:
- Easy and fun to apply
- Affordable
- Cleans off easily
Cons:
- More expensive than glue stick, but lasts longer
Aquanet Extra Hold Hairspray
Aquanet, ONLY Aquanet. It's the tall purple bottle that seems increasingly more difficult to find in stores. If only they would have focused some marketing efforts to 3D printer users. Oh well. It works great! The reason it does is because of two chemicals found within this hairspray. They are VA/Crotonates/Vinyl Neodecanoate Copolymer and Acrylates Copolymer. You can look for these two elements within any other hair spray as well if you like, but Aquanet is the go-to.
All you need to do is just spritz a little on your print surface and let it dry. When used with heat, it works extremely well to make a sticky surface that your 3D prints will surely adhere to. Whoever discovered this gem of an adhesion use made Aquanet some serious sales - they deserve a commish.
Pros of Aquanet:
- Creates great adhesion
- Lasts a long time - one can will last over 100 prints
- No residue left behind, clean printing
Cons:
- Risk of getting bearings and rods sticky when applying
PEI Sheet
PEI, also known as Polyetherimide is a print surface that has been very commonly used. It normally is an adhesive backed surface that can be applied to any 3D printer. This surface is known for having great adhesion and results in good print surface quality. Also, PEI can be sanded when it begins losing adhesion over time and it will rejuvenate the adhesion properties, which is pretty awesome.
These PEI sheets usually come in a clear color, so they look rather nice on the surface of any print bed.
Pros of PEI sheet:
- Easy to apply
- Affordable
- Great surface print quality
- Sanding makes it last longer
Cons:
- Prone to denting
Plastic Sheets from BuildTak and GeckoTek
BuildTak and GeckoTek both make similar adhesive backed sheets that you can EASILY apply to your 3D printer surface and utilize to get ultimate adhesion with a multitude of materials. Our Robo C2 and Robo R2 3D printers come standard with custom sized BuildTak sheets, which work extremely well.
Pros of BuildTak and GeckoTek:
- Application is easy
- Last a long time
- Work extremely well
Cons:
- Sometimes adhesion is too good
- Can crack if print sticks too well
- Gecktek is not compatible with Robo C2 or Robo R2 with IR leveling sensors.
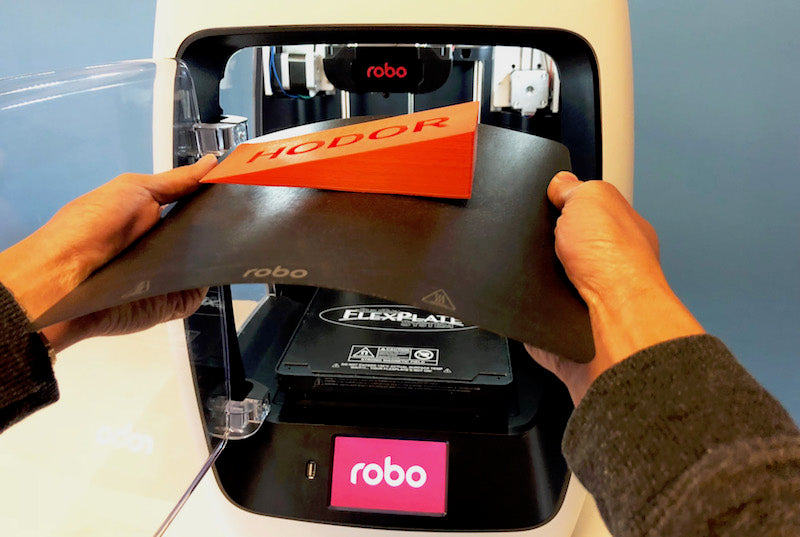
Flex Plates
Flex plates are becoming a new fad in desktop 3D printing. A flex plate is essentially a spring steel surface covered with an adhesion surface, like BuildTak, that attaches to a 3D print surface with magnets for easy removal and print pop-off.
With that being said, Robo is coming out with a custom BuildTak flex plate system for the Robo R2 soon (as seen in the picture above)! Sign up below to be notified the minute it gets released.
Pros of BuildTak flex plate system:
- Removable platform
- Easy to pop-off print
- Convenient use for life of printer
- Functions beautifully
Cons:
- Expensive compared to alternatives
Steve
June 04, 2018
Would like to see a print bed adhesion solution developed for the C2. It feels like the forgotten printer and not everyone can afford the R2.
Robo 3D
June 06, 2018
Hi Steve,
With the Robo C2, the build plate already flexes so that your prints will be able to pop off. It also comes with BuildTak.
Best,
Robo 3D